ImageJ: Morphological operations#
Show code cell content
%load_ext autoreload
%autoreload 2

# Default imports
import sys
sys.path.append('../../../')
from helpers import *
from matplotlib import pyplot as plt
from myst_nb import glue
import numpy as np
from scipy import ndimage
Introduction#
ImageJ’s submenu contains various useful commands for working with binary images, including some of the morphological operations we’ve looked at.
However, there are other useful morphological operations lurking elsewhere – although most require extra plugins, or switching to Fiji.
Erosion, dilation, opening & closing#
contains the commands , , and commands.
These are relevant here, but my advice is to avoid them. By default they work with fixed 3×3 pixel neighborhoods, but they could do something different if someone has been messing about with the Iterations (1-100) or Count (1-8) options under – and this unpredictability could well cause trouble.
To perform erosion, dilation, opening and closing with more control and possibly larger neighborhoods, I strongly prefer to use the and commands, combining them if necessary.
Morphological operations in Fiji
Fiji contains , which provides a more flexible implementation of erosion, dilation, opening and closing using a variety of shapes for both grayscale and binary images.
You can also find the plugin for ImageJ at https://imagej.nih.gov/ij/plugins/gray-morphology.html
Outlines, holes & skeletonization#
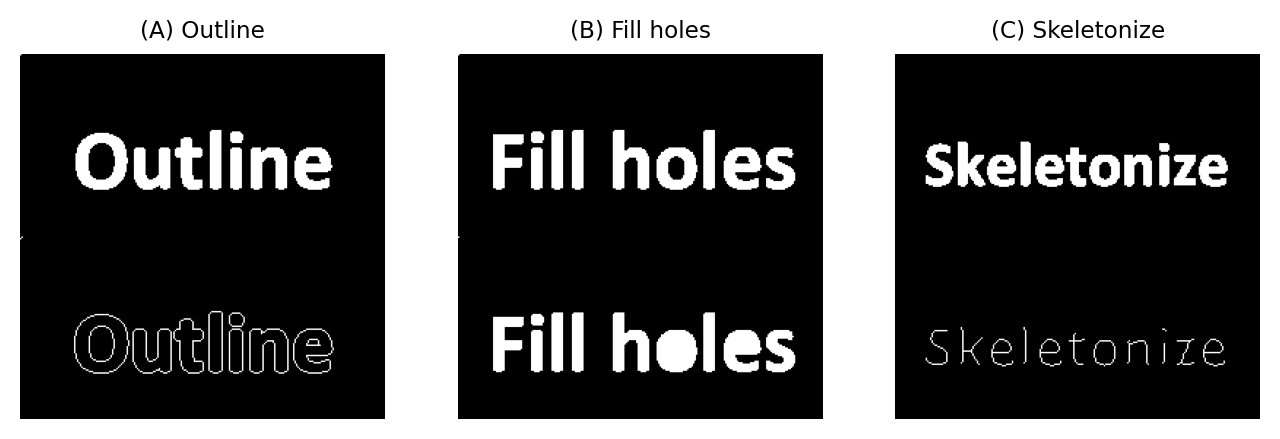
The command, predictably, removes all the interior pixels from 2D binary objects, leaving only the perimeters (Fig. 116A).
would then fill these interior pixels in again, or indeed fill in any background pixels that are completely surrounded by foreground pixels (Fig. 116B).
shaves off all the outer pixels of an object until only a connected central line remains (Fig. 116C).
Analyzing skeletons
If you are analyzing linear structures (e.g. blood vessels, neurons), then this command or those in Fiji’s submenu may be helpful.
Show code cell content
fig = create_figure(figsize=(8, 4))

# There are different ways to generate outlines, depending upon how thick they should be
# and whether we get the 'inner' or 'outer'.
bw_outline = load_image('images/outline.png') > 0
bw_outlined = ndimage.binary_dilation(bw_outline) ^ bw_outline

# Fill holes
bw_fill = load_image('images/fill_holes.png') > 0
bw_filled = ndimage.binary_fill_holes(bw_fill)

# ndimage doesn't include skeletonize - so use skimage instead
# (Note that different skeletonize algorithms might give different results)
from skimage.morphology import skeletonize
bw_skeletonize = load_image('images/skeletonize.png') > 0
bw_skeletonized = skeletonize(bw_skeletonize)

# Show original concatenated with the filtered images
show_image(np.vstack((bw_outline, bw_outlined)), title="(A) Outline", pos=131)
show_image(np.vstack((bw_fill, bw_filled)), title="(B) Fill holes", pos=132)
show_image(np.vstack((bw_skeletonize, bw_skeletonized)), title="(C) Skeletonize", pos=133)
glue_fig('fig_outline_fill_skeleton', fig)

Fig. 116 The effects of the , and commands.#
The outline of an object in a binary image can also be determined by applying one other morphological operation to a duplicate of the image, and then using the . How?
To outline the objects in a binary image, you can simply calculate the difference between the original image and an eroded (or dilated, if you want the pixels just beyond the objects) duplicate of the image.
Other morphological operations#
ImageJ doesn’t contain an implementation of morphological reconstruction, and therefore doesn’t support all the extra operations that derive from it.
However, there’s an extremely library called MorphoLibJ that can be added to ImageJ or Fiji, which contains morphological reconstruction and much more.
Check out the excellent documentation at https://imagej.net/plugins/morpholibj for more details.

